Monday, December 29, 2014

Reset forgotten Windows Built-In Administrator Passwords using LockSmith Tool

------------------------------------------------------------------------------------------------

Often when users install Windows, generally they setup a local user (Administrator) and then they configure the domain account. After configuring the domain account users usually never login onto our Local User Account. Sometimes user needs to login onto the Local user account for different reasons.

For e.g. Domain account password expired, User forget password, Server comes out of domain accidentally and much more reasons when user need to login with Local Admin Account. In that case many users reformat the machine. But ideally spending time on reformatting the machine may not be a good option. So, how do we reset the password of the locked account? We have a solution for this problem. The solution is using DaRT.

MS DaRT stands for "Microsoft Diagnostics and Recovery Toolkit"

There can be 2 scenarios:-

1. Physical Server

2. Virtual Server

In both the cases you need to "Boot your computer with ERD Commander / MS Dart Boot CD"

Here are the steps:-

Step 1: Obtain the Diagnostics and Recovery Toolset 6.0 and create the recovery cd using ERD Commander Boot Wizard based upon WinPE or obtain the CD from the Local IT.

Step 2: Boot the target machine using the DaRT Recovery CD


Select No for NetStart, we don’t require the network connectivity.

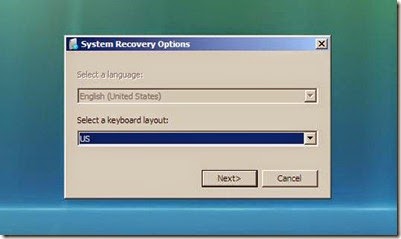
Step 3: Select the appropriate language. Default is US and click on Next


Step 4: Select the Operating System. If you have more than 2 Operating Systems, it will show 2 operating systems and Click on Next 


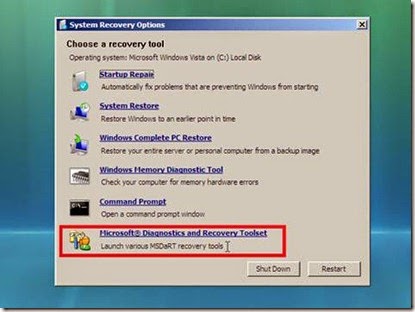
Step 5: Once loaded you will see it’s like Windows Vista Bootable DVD Repair tools but with 1 more additional option ‘Microsoft Diagnostics and Recovery Toolset’; click on it.


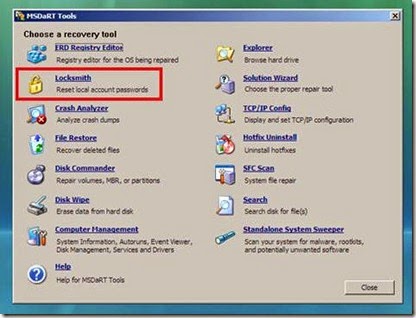
Step 6: You will see following tools in DaRT. Click on Locksmith


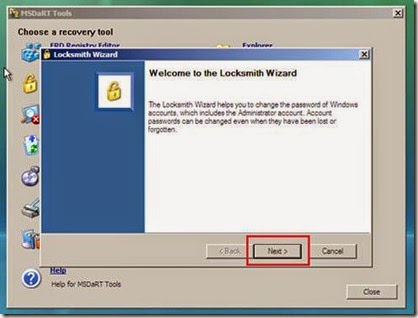
Step 7: This will launch Locksmith wizard. Click on Next


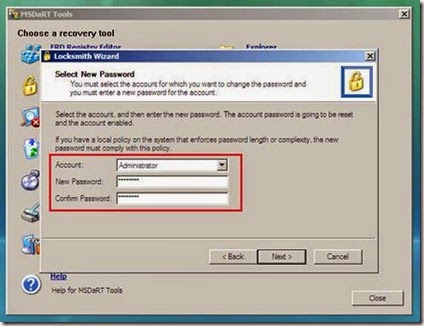
Step 8: This will show ‘Select New Password’ window. Select the account you want to reset the password. And provide the new password. After that click on Next


Step 9: You will get dialog box ‘Completing the Locksmith Wizard’ On next restart you will have an option to Change the local user account password after you log in.


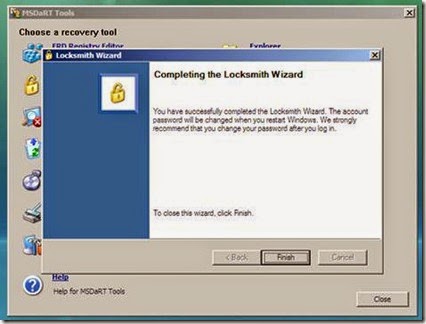
Click on Finish. Click on Close and Restart


Now, You can login to Windows with your new password. :)

Friday, March 1, 2013

Seizing FSMO Roles


Seizing FSMO Roles
How can I forcibly transfer (seize) some or all of the FSMO Roles from one DC to another?
Windows 2000/2003 Active Directory domains utilize a Single Operation Master method called FSMO (Flexible Single Master Operation), as described in Understanding FSMO Roles in Active Directory.
The five FSMO roles are:
  • Schema master - Forest-wide and one per forest.
  • Domain naming master - Forest-wide and one per forest.
  • RID master - Domain-specific and one for each domain.
  • PDC - PDC Emulator is domain-specific and one for each domain.
  • Infrastructure master - Domain-specific and one for each domain.
In most cases an administrator can keep the FSMO role holders (all 5 of them) in the same spot (or actually, on the same DC) as has been configured by the Active Directory installation process. However, there are scenarios where an administrator would want to move one or more of the FSMO roles from the default holder DC to a different DC.
However, when the original FSMO role holder went offline or became non operational for a long period of time, the administrator might consider moving the FSMO role from the original, non-operational holder, to a different DC. The process of moving the FSMO role from a non-operational role holder to a different DC is called Seizing, and is described in this article.
If a DC holding a FSMO role fails, the best thing to do is to try and get the server online again. Since none of the FSMO roles are immediately critical (well, almost none, the loss of the PDC Emulator FSMO role might become a problem unless you fix it in a reasonable amount of time), so it is not a problem to them to be unavailable for hours or even days.
If a DC becomes unreliable, try to get it back on line, and transfer the FSMO roles to a reliable computer. Administrators should use extreme caution in seizing FSMO roles. This operation, in most cases, should be performed only if the original FSMO role owner will not be brought back into the environment. Only seize a FSMO role if absolutely necessary when the original role holder is not connected to the network.
What will happen if you do not perform the seize in time? This table has the info:
FSMO Role
Loss implications
Schema
The schema cannot be extended. However, in the short term no one will notice a missing Schema Master unless you plan a schema upgrade during that time.
Domain Naming
Unless you are going to run DCPROMO, then you will not miss this FSMO role.
RID
Chances are good that the existing DCs will have enough unused RIDs to last some time, unless you're building hundreds of users or computer object per week.
PDC Emulator
Will be missed soon. NT 4.0 BDCs will not be able to replicate, there will be no time synchronization in the domain, you will probably not be able to change or troubleshoot group policies and password changes will become a problem.
Infrastructure
Group memberships may be incomplete. If you only have one domain, then there will be no impact.
Important: If the RID, Schema, or Domain Naming FSMOs are seized, then the original domain controller must not be activated in the forest again. It is necessary to reinstall Windows if these servers are to be used again.
The following table summarizes the FSMO seizing restrictions:
FSMO Role
Restrictions
Schema
Original must be reinstalled
Domain Naming
RID
PDC Emulator
Can transfer back to original
Infrastructure
Another consideration before performing the seize operation is the administrator's group membership, as this table lists:
FSMO Role
Administrator must be a member of
Schema
Schema Admins
Domain Naming
Enterprise Admins
RID
Domain Admins
PDC Emulator
Infrastructure

To seize the FSMO roles by using Ntdsutil, follow these steps:
Caution: Using the Ntdsutil utility incorrectly may result in partial or complete loss of Active Directory functionality.
  1. On any domain controller, click Start, click Run, type Ntdsutil in the Open box, and then click OK.
Microsoft Windows [Version 5.2.3790]
(C) Copyright 1985-2003 Microsoft Corp.
 
C:\WINDOWS>ntdsutil
ntdsutil:    
  1. Type roles, and then press ENTER.
ntdsutil: roles
fsmo maintenance:

Note: To see a list of available commands at any of the prompts in the Ntdsutil tool, type ?, and then press ENTER.
  1. Type connections, and then press ENTER.
fsmo maintenance: connections
server connections:

1.Type connect to server <servername>, where <servername> is the name of the server you want to use, and then press ENTER.

server connections: connect to server server100
Binding to server100 ...
Connected to server100 using credentials of locally logged on user.
server connections:

1.       At the server connections: prompt, type q, and then press ENTER again.

server connections: q
fsmo maintenance:

1.       Type seize <role>, where <role> is the role you want to seize. For example, to seize the RID Master role, you would type seize rid master:

Seize domain naming master
Seize infrastructure master
Seize PDC
Seize RID master
Seize schema master

1.       You will receive a warning window asking if you want to perform the seize. Click on Yes.
Note: All five roles need to be in the forest. If the first domain controller is out of the forest then seize all roles. Determine which roles are to be on which remaining domain controllers so that all five roles are not on only one server.
  1. Repeat steps 6 and 7 until you've seized all the required FSMO roles.
  2. After you seize or transfer the roles, type q, and then press ENTER until you quit the Ntdsutil tool.
Note: Do not put the Infrastructure Master (IM) role on the same domain controller as the Global Catalog server. If the Infrastructure Master runs on a GC server it will stop updating object information because it does not contain any references to objects that it does not hold. This is because a GC server holds a partial replica of every object in the forest.

Thursday, February 21, 2013

Delete ALL SMTP Queues In Exchange 2010


---------------------------------------------------------------------------------------
Delete ALL SMTP Queues In Exchange 2010

Scenario:
Al of a sudden you have figured out there are thousands of messages are queued up on your Edge server and you have identified all these messages are spam etc.
image
End goal:
you need to delete all mails within the queue folder as quick as possible
On the Edge Server  Stop Transport Service


Get-Service MsExc*
image

Get-Service MsExc* |FL
image
image

Get-Service MsexchangeTransport

image

Stop-Service MsExchangeTransport
image

Start-Service MsExchangeTransport

once this is done drill down to this directory
image

Select everything and delete them
image

Once you re-start the transport service , the required files will be put in there and all queues will be cleared out

image

This is quick and dirty way of dealing with un-wanted mails if there are mails in the queues which you have business purpose you can be more sophisticated with this PS command

Delete ALL SMTP Queues In Exchange 2007 (Quick and Dirty)


------------------------------------------------------------------------------------------
Delete ALL SMTP Queues In Exchange 2007

In essence, to completely wipe out the queues in Exchange 20007 perform the following steps:


  1. Stop Exchange Transport
  2. Browse to the folder where mail.que is stored (our server was in mail.que at c:\program files\Microsoft\Exchange Server\TransportRoles\data\Queue)
  3. Delete or move everything there
  4. Start the Exchange Transport
  5. Open up Queue Viewer, and verify that every thing's cleared..Exchange has now recreated mail.que and associated files like in the beginning of time.

Note: The physical path of the mail queue which also could be found by looking for the file mail.que like above. Since the mail queues are ESE, simply removing the mail.que file may not work (just like removing the edb/stm file without removing the related transaction logs)

Start the Exchange Transport Service again if you want to start the queue/mails again.

Turn off Internet Explorer Enhanced Security Configuration


-----------------------------------------------------------------------------------------------------------------

Turn off the extra security in IE


# Steps to Turn Off Enhanced Security on Windows Server 2003


When trying to use the web browser, several actions are being blocked, hindering the download of important files. The error message reads "Content from the Web site listed below is being blocked by the Internet Explorer Enhanced Security Configuration." How can the Internet Explorer Enhanced Security Configuration be disabled on Windows 2003 Server or Windows 2008 Server?

Steps:
  1. Go to Control Panel
  2. Open "Add or Remove Programs"
  3. Select "Add/Remove Windows Components"
  4. Uncheck the checkbox labeled "Internet Explorer Enhanced Security Configuration" and click "Next"
  5. Close all Internet Explorer browsers.
  6. Open a new browser to attempt the download again.


# Steps to Turn Off Enhanced Security on Windows Server 2008 & Windows Server 2008 R2


Steps:
  1. Close all IE browsers.
  2. Open the "Server Manager"
  3. Click on the top item in the tree labeled "Server Manager"
  4. Open up the "Server Summary" tab.
  5. Open the secondary tab named "Security Information"
  6. Locate and open the "Configure IE ESC" link on the right of the window

This is the window that you will use to control IE ESC. You can turn IE ESC on or off for the Administrators group, the User group, or both groups. When you have finished configuring the IE ESC, press OK and close the server manager. Now open up a new browse, the browsers home screen should say, "Caution: Internet Explorer Enhanced Security Configuration is not enabled". If it does not say this go back and check to make sure you have followed the steps correctly, if it does say that you have successfully disabled IE ESC on your Windows 2008 Server.

# Steps to Turn Off Enhanced Security on Windows Server 2012


Steps in GUI - Graphical User Interface:

1. On the Windows Server 2012 server desktop, locate and start the Server Manager.
-
-
2. Select Local Server (The server you are currently on and the one that needs IE ESC turned off)
-
-
3. On the right side of the Server Manager, you will by default find the IE Enhanced Security Configuration Setting. (The default is On)
-
-
4. You have two settings that can be disabled, one only affects the Administrators and the other all users. The preferred method when testing (if for example SharePoint) is to use a non-admin account and if that is the case, disable the IEESC only for users. Using a local administrator account would cause an additional threat to security and it will also often not give you the required result in tests, since the administrator has permissions where a normal user do not.
Make your selection to Off for Administrators, Users or both.
-
-
5. In this example, I have selected to completely disable Internet Explorer Enhanced Security. When your seelction is made, click OK.
-
-
6. Back in the Server Manager, you will see that the setting has not changed at all. Press F5 to refresh the Server Manager and you wil see that it is changed to Off.
-
-
Done, open up a IE browser windows and try to access any internal site to test the setting, you will notice that you no longer are prompted in the same way.

Steps in Powershell:

(Best I can do, if you know of any OOB CMDlets that does the trick, please drop a comment and let me know:
Put the code below in a textfile and save it with a ps1 extension i.e. Disable-IEESC.ps1
(This will disable both Administrator and User IE ESC)
function Disable-IEESC
{
$AdminKey = “HKLM:\SOFTWARE\Microsoft\Active Setup\Installed Components\{A509B1A7-37EF-4b3f-8CFC-4F3A74704073}”
$UserKey = “HKLM:\SOFTWARE\Microsoft\Active Setup\Installed Components\{A509B1A8-37EF-4b3f-8CFC-4F3A74704073}”
Set-ItemProperty -Path $AdminKey -Name “IsInstalled” -Value 0
Set-ItemProperty -Path $UserKey -Name “IsInstalled” -Value 0
Stop-Process -Name Explorer
Write-Host “IE Enhanced Security Configuration (ESC) has been disabled.” -ForegroundColor Green
}
Disable-IEESC
(You have to hit enter twice after pasting the script)
 
Powershell
Done!

BSNL Broadband Error Numbers and its Solutions


---------------------------------------------------------------------------
Trouble shooting in Broadband (Dataone)

Problem
 Description
 Remedy 
Error- 678
This is most common problems. It is due to poor connectivity.
1. Switch off / Switch on Modem (Power Switch at the back of modem) and wait for 2 minutes. Then retry.
2. If problem is still not solved then
A) Check link lamp in Black type Modem or WAN lamp in White Modem. If it is blinking, then it is line problem.
B) Check Modem to splitter connectivity.
i) Remove & Connect the cable of / to the modem and to the splitter
ii) Remove & Connect the telephone connection of the splitter.
3. If lamp is still blinking - then it is due to poor line condition / fault. Call lineman for line change.
 
4. Check for Virus in Your PC.
5. Disable Firewall in your PC.

6. Reinstall Windows
Error- 691
User id and Password problem.
Enter correct username and password spellings as details are case sensitive.
Make new Dialer.
Dial
The case is to be Booked in Dotsoft  with note “User id and Password problem”
Call NIB for resetting password.
 

Error- 769

LAN not enabled.
The LAN Card has to be enabled by following the steps given below.
i) Go to Desktop.
ii) Right Click “My Network Place".
iii) Click  Select Properties.
iv) Right click on LAN Icon Click "Enable the local network".

If using USB cable then Install Modem's USB Cable Driver.

Error- 797

Modem or LAN driver problem
check computer LAN Card driver or Modem connectivity.
Check for Viruses or corrupt TCP/IP Files
 
Error- 718

This problem occurs if loading is high on the system and number of customers exceed the call handling capacity of system
Error - 630-633
 Computer LAN Card problem.
 LAN Card has to be changed.


Error- Limited or No Connectivity
 
IP Address Problem
 
Give Correct IP Address to LAN card
Error- 735
 
 Dialer problem
 
Make New Dialer.
 
Error - 720
 Dialer or Virus problem
 
Make New Dialer
Check for Virus in your PC..
Reinstall Windows
 
Error- 676
 
Modem Configuration problem
 
Give Correct IP Address to LAN card
Change PVC 0/35 to Bridge Mode instead of PPPOE mode


Broadband IP Addresses for LAN >>>

Following IP addresses should be used if Modem is provided by BSNL.
Private Modems may have different IP Addresses.

 
        • IP Address                 - 192.168.1.2 to 250 (may be given 2,3, 4,......248 or 249 upto 250)
        • Subnet Mask             - 255.255.255.0
        • Default gateway        - 192.168.1.1 
           
        • Default DNS Address - 192.168.1.1

Broadband Utilities

 Description
 Remedy 
The Web Registration for Broadband Usage Alerts of your BSNL Broadband connection is available at
Log in to Broadband, Go to
Click on Service Record. Details of the current month usage and previous month will be shown.

To change password
1. Click on Service Record.
2. Click on 'change password', give 'Old password', 'New password' and confirm. Password will be changed.


  Modem: - 1. After switch ON wait for 2 to 3 minutes to get the modem stable.         
                  2. If telephone line / dial tone problem, complaint should be booked.
                  3. If Broadband / Internet not working, complaint should be booked in Dotsoft
                    (Dial 198 from BSNL landline) or contact 1800-424-1600  /  1500.

Lamp features (White Modem)
Lamp features (Black Modem)
(A) Power - Red

(A) Power - Red

(B) WAN  -Yellow
When stable-OK
When blinking- Data transfer
when not stable- Line is faulty
(B) WAN   -Yellow
When stable-OK
When blinking- slow, line trouble
(C) LAN /ADSL
- Green
When stable-OK
When blinking fast - Data transfer
When blinking slow- Modem to PC link problem
(C) LAN /ADSL  - Green

When stable-OK

(D) PPPoE - No use.
No use.

(D) Data - Green - Flashing

Data transfer


676 Error - Procedure for MODEM setting


Configure Broadband in pppoe mode and  Internet in bridge mode.
 
BRIDGE mode :   Steps:-
1.     Connect ADSL modem to your PC with straight Ethernet Cable (RJ45)
2.     Open Internet Explorer and type : http://192.168.1.1 and give enter .An windows will open after pressing ENTER button
3.     Type user as admin and password as admin in that WINDOW.
4.     NOW In the opened window click advanced setup      
   
5. Click edit button against VPI/VCI  in the 0/35 row. following below window will open .
6. You will get ATM PVC configuration, make VPI to “0” and VCI to “35” go to next.

7. Select connection type as BRIDGE and click NEXT.


8. Click SAVE. Then In the Wide area network setup window, click Save/Reboot.(In this case modem will be reset automatically ,PC will not reboot.)

9. After 2 Minute Connect the broadband.